Wednesday 23 May 2018

Faux Vellum Effect with Distress Oxide Inks

Hello friends & welcome to another Heartfelt  inspiration post


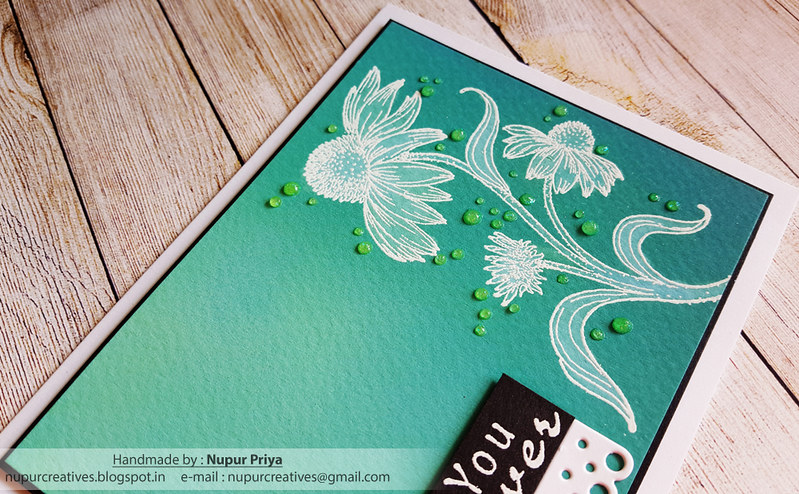
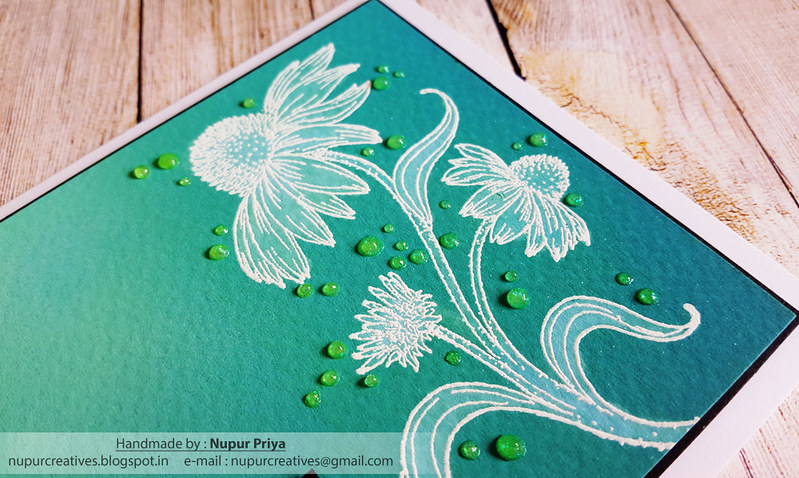
I have made a card with Faux Vellum effect for today's inspiration... 

I have used Distress Oxide inks for this technique.
These are special dye and pigment ink fusion which react with water to create oxidized effect and we are going to use this very unique property for today's technique.

I have inked the background using Cracked PistachioLucky Clover Salty Ocean Distress Oxide Inks and then used my Koi Waterbrush filled with clear water to lift up the ink.
You can also use a simple paintbrush with clean water for this step but I find that a waterbrush is faster and easier to use for this technique.

Scroll down for full instructions and the supply list for this card....
20180502_075156

20180502_075325

20180502_075337

Heartfelt Creations Products: 
HCPC-3758 Encourage You Cling Stamp Set

HCPC-3826 Blossoming Coneflower Cling Stamp Set
HCD1-7150 Window Box Elements Die
HCPP1-438-2 Paper Pack of 10 - White
HCPP1-438-1 Paper Pack of 10 - Black
RPEJ685 Embossing Powder - White
RAHT Heat It Craft Tool
HCDA2-450 Stack and Store Daubers-Pack of 30
173842 Scor-Pal Measuring & Scoring Board
368771 Scor-Tool
D110305 Stamp Mat Pad
359848 Spellbinders Tool N' One
411231 5pc. Acrylic Block Set
532423-KIT Sizzix Vagabond 2 With Solo Wafer-Thin Die Adapter
352854 Metal Tip for Adhesive Bottles
PIN6 Glue Tip Pins
159723 Designer Dries Clear Adhesive
D120601 Darice Adhesive Foam Strips

Other Products :

Cracked PistachioLucky Clover Salty Ocean Distress Oxide Inks, Canson watercolor cardstockKoi WaterbrushWhite Blizzard Nuvo Glitter Drops and Versamark Ink.

Instructions :

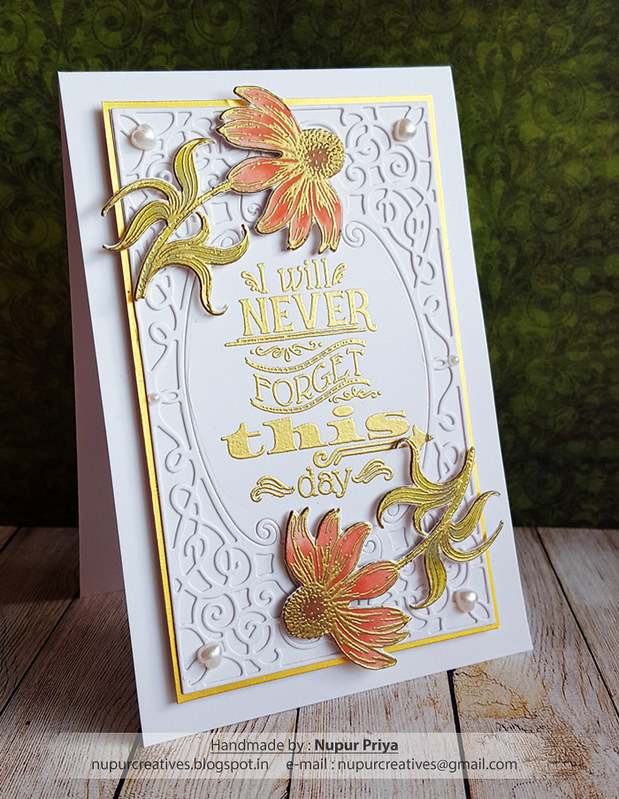
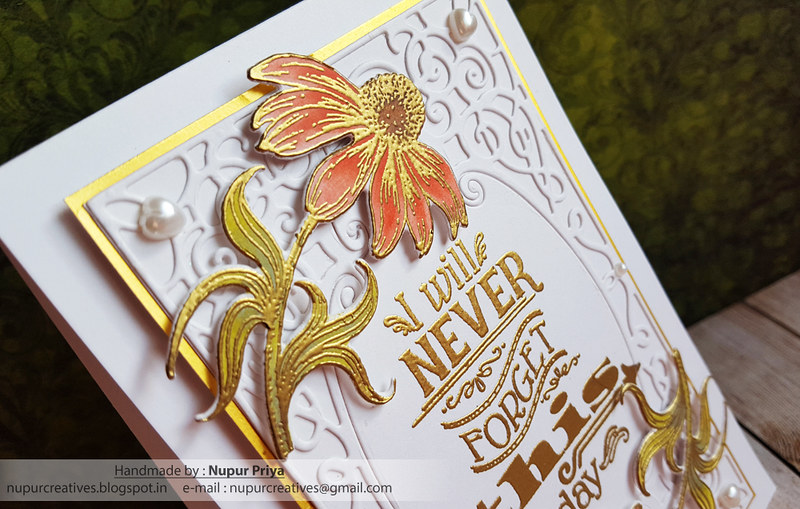
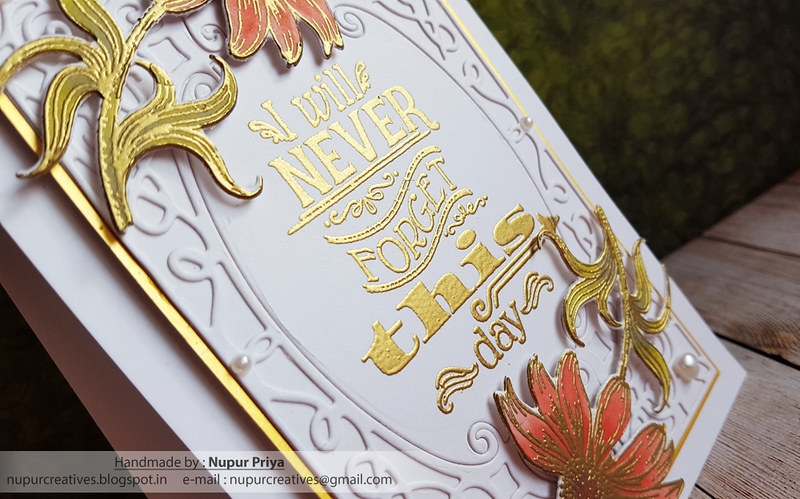
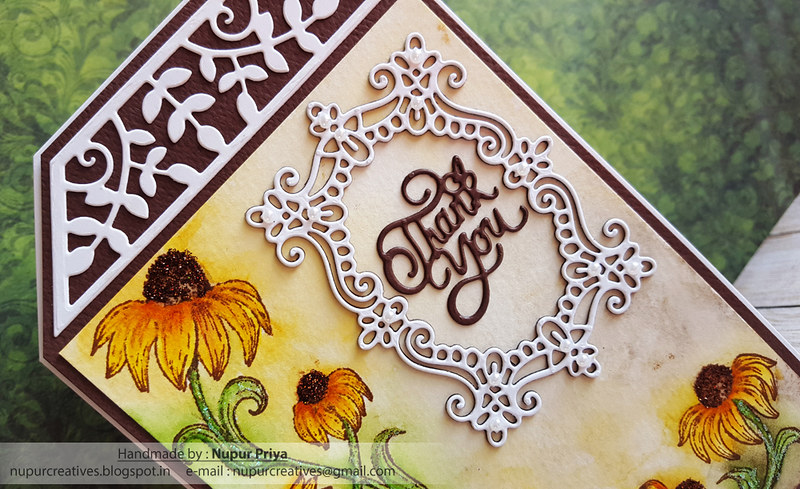
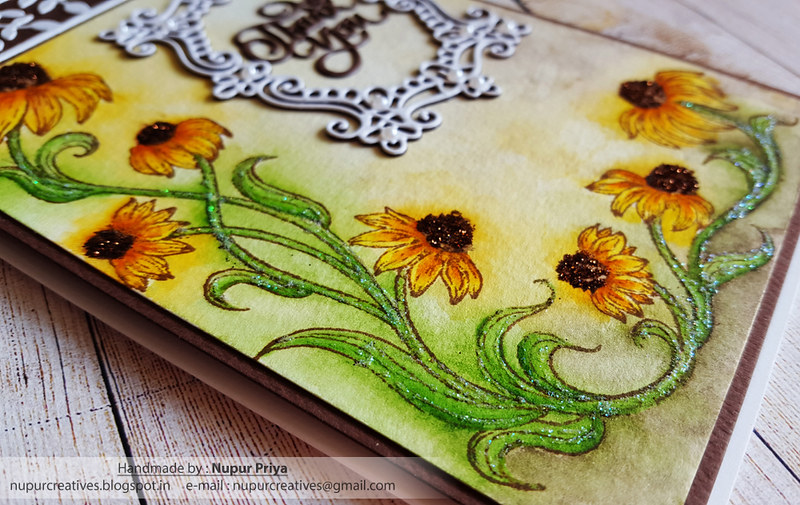
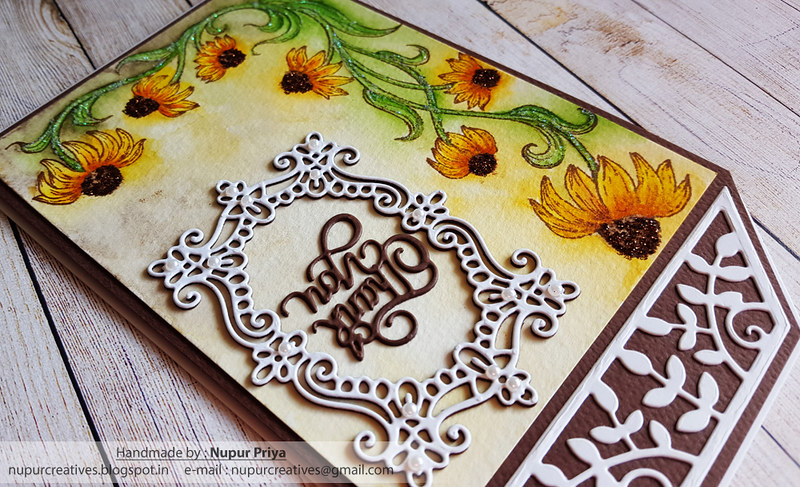
Take a piece of 3 3/4" x 5"  watercolor cardstock and heat emboss the image from Blossoming Coneflower Cling Stamp Set using Versamark InkWhite Embossing Powder &  Heat It Craft Tool. Ink it with Cracked PistachioLucky Clover Salty Ocean Distress Oxide Inks. Now take the Koi Waterbrush & color in the image with water in small areas & dab it with a piece of cloth to lift up the ink. Adhere this piece on a slightly larger piece of black cardstock & then adhere it to a 4 1/4" x 5 1/2"  white cardbase using Darice Adhesive Foam Strips.

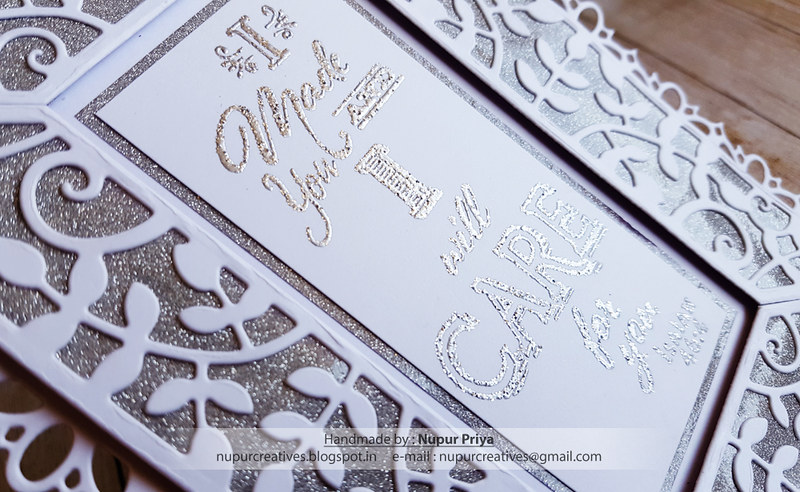
Heat emboss the sentiment from Encourage You Cling Stamp Set using Versamark ink, White Embossing Powder &  Heat It Craft Tool on a piece of black cardstock & trim it as shown. Adhere it to the card front using Darice Adhesive Foam Strips.  Die cut a piece of white cardstock using the die from Window Box Elements Die & trim it to the required size & glue it below the sentiment using Designer Dries Clear Adhesive. Add some drops of  White Blizzard Nuvo Glitter Drops around the flower image to add finishing touch.


Hope you like it...


Thank you for visiting today... :)
Nupur

Disclosure : Compensated affiliate links used when possible  at NO additional cost to you.. Thank you! 

Coloring with Distress Oxide Inks

Hello friends & welcome to another Heartfelt  inspiration post
I have made a card for today's inspiration which used Distress Oxide Inks as the coloring medium...
 Distress Oxide inks give a beautiful velvety look and don't you just loved the results when it is paired with Gold!!!

I wanted to make a simple and elegant card card with a rich look and so I decided to use Gold embossing for the images and colored them with Distress Oxide inks.

Read till the end for the supply list & instructions on how to make this card....
20180502_074803

20180502_075030


20180502_075037


20180502_075044


Heartfelt Creations Products: 

HCPC-3813 Today's Quotes Stamp Set
HCPC-3828 Garden's Edge Coneflower Cling Stamp Set
HCD2-7191 Intricate Swirl Frames Die
HCD1-7182 Garden's Edge Coneflower Die
HCPP3-452 12 x 12 Cardstock Pack of 25 - White
173842 Scor-Pal Measuring & Scoring Board
D110305 Stamp Mat Pad
359848 Spellbinders Tool N' One
31510 Funnel Tray
411231 5pc. Acrylic Block Set
532423-KIT Sizzix Vagabond 2 With Solo Wafer-Thin Die Adapter
159723 Designer Dries Clear Adhesive
352854 Metal Tip for Adhesive Bottles
D120601 Darice Adhesive Foam Strips
359760 Embossing Powder - Gold
RAHT Heat It Craft Tool
247027 Fantastix Blending Tool

Other Products:

Abandoned CoralCandied AppleWalnut Stain and Peeled Paint Distress Oxide Inks, Versamark Ink, Gold cardstock and pearls.

Instructions:

Stamp the sentiment from Today's Quotes Stamp Set on a piece of white cardstock using Versamark Ink twice and heat emboss it using  Gold Embossing Powder and  Heat It Craft ToolDie cut this piece using the die from  Intricate Swirl Frames Die so that the sentiment is in the middle. Adhere it on a piece of same sized white cardstock as shown. glue it to a slightly larger piece of gold cardstock.  Glue down this panel on a 4" x 6" white cardbase using  Darice Adhesive Foam Strips.

Stamp the image from Garden's Edge Coneflower Cling Stamp Set on a piece of  white cardstock using Versamark ink twice & heat emboss it using  Gold Embossing Powder and  Heat It Craft Tool. Color it using Abandoned CoralCandied AppleWalnut Stain and Peeled Paint Distress Oxide Inks and Fantastix Blending Tool. Die cut them using the matching die from  Garden's Edge Coneflower Die. Adhere it to the card front as shown using  Darice Adhesive Foam StripsAdd some pearls to add finishing touches.


Hope you like it...


Thank you for visiting today... :)
Nupur
Disclosure : Compensated affiliate links used when possible  at NO additional cost to you.. Thank you! 

Wednesday 9 May 2018

Loose Watercoloring And Stacked Die Cuts

Hello friends & welcome to Heartfelt inspiration...
We have a new release this week

Backyard Blossoms Collection!

Summer brings with it the excitement of a new gardening season, lounging in the open expanse of the backyard and enjoying the beauty of favorite perennial blossoms dancing gently in the warm summer breeze! Among those returning favorites are the attractive, butterfly loving coneflower! Bright and colorful, these pretty flowers come dressed in a wide variety of hues and quietly display their domed centers and soft delicate petals against the backdrops of ornamental grasses and other decorative backyard plantings! Come along with us as we welcome back the summer season with a walk through the Backyard Blossoms Collection by Heartfelt Creations! Brilliantly hued, and filled with a good dose of summer sunshine, the fabulous paper collection showcases happy shades of bright yellows, pretty pinks, luscious lavenders and glorious greens and showcases lovely lace like patterns, elegant swirls and bountiful coneflower blossoms! Included in this jubilant and cheerful assembling are three exquisitely illustrated cling stamps sets with coordinating dies ideal for all of your summer themed paper craft creations! From large coneflower images, ornamental grasses, to smaller backyard blossom accents, these dynamic illustrations are ideal for creating your very own dimensional flower gardens as focal points on card fronts or as accents on scrapbook layouts! So grab your lounge chair, slather on the sunscreen and join us as we kick back and relax in the backyard enjoying our favorite backyard blossoms!


I have made a card for today's inspiration with loose watercoloring technique...
If you have followed my blog for quiet sometime then you would have probably noticed that this is not my style... but I decided to try something new... I know it's not perfect but I still like the end result. 

To make the sentiment stand out I stacked 1 white die cut frame above 2 brown frames. This is a good technique when you want to add dimension to a die cut but the diecut is too delicate and there are not enough places to add foam adhesive. Stacking die cuts of 2 or more colors add a little interest to the design without being too overpowering.

Scroll down for the list of products & full instructions for this card...
20180502_074203

20180502_074240

20180502_074331

20180502_074347

Heartfelt Creations Products: 

HCPC-3826 Blossoming Coneflower Cling Stamp Set
HCD1-7179 Butterfly Kisses Decorative Die
HCD2-7190 Frame a Card Leafy Borders Die
HCD2-7192 Eyelet Lace Frames Die
RACP451 Ranger Archival Ink Pad - Coffee
HCPP3-452 12 x 12 Cardstock Pack of 25 - White
173842 Scor-Pal Measuring & Scoring Board
D110305 Stamp Mat Pad
359848 Spellbinders Tool N' One
31510 Funnel Tray
411231 5pc. Acrylic Block Set
532423-KIT Sizzix Vagabond 2 With Solo Wafer-Thin Die Adapter
159723 Designer Dries Clear Adhesive
352854 Metal Tip for Adhesive Bottles
D120601 Darice Adhesive Foam Strips
120 Blue Rain Ultrafine Transparent Glitter

Other Products:

Gansai Tambi watercolors, paint brushes, brown glitter, brown & watercolor  cardstock & pearls.

Instructions:

Stamp the image from  Blossoming Coneflower Cling Stamp Set on a piece of watercolor cardstock using Coffee  Archival Ink and watercolor it using Gansai Tambi watercolors. Use the Designer Dries Clear Adhesive along with Metal Tip to draw lines of glue on the stems and leaves and sprinkle it with Blue Rain Ultrafine Transparent Glitter. Similarly add dots of glue to the flower centers and sprinkle it with brown glitter. Trim the colored panel to 4" x 5 1/2" after the  glue dries and adhere it to a piece of brown cardstock. Die cut a piece of white cardstock using the die from Frame a Card Leafy Borders Die. Adhere it to the top of the colored panel. Trim the brown cardstock after leaving a 1/8" boder all around the die cut & colored panel. Adhere it to a 4 1/2" x 7" white cardbase  using  Darice Adhesive Foam Strips. Trim away the corners as shown.

Die cut 2 pieces of brown and 1 piece of white cardstock using the die from Eyelet Lace Frames Die. Stack and glue them together so that the white piece is on top and adhere it to the card front as shown. Die cut 2 pieces of brown cardstock using the Thank You die from Butterfly Kisses Decorative Die. Stack and glue them together and then adhere it inside the die cut frame as shown. Add some pearls to add finishing touches.


Hope you like this card...
Thank you for visiting today... :)
Nupur
Disclosure : Compensated affiliate links used when possible  at NO additional cost to you.. Thank you! 

Wednesday 2 May 2018

Quick And Easy Die Cut Cardbase

Hello friends & welcome to Heartfelt Wednesday...
Before we move on to my card here is an exciting offer for my lovely readers..


Click HERE to avail this offer 

Do you sometimes need to make a card but don't have enough time???
Well if you are in such a situation then I have a solution for you...

Sometimes we all need to make a card that is quick but still looks beautiful and when times like this arises then I turn to my dies... A quick way is to make the card base using a large lacy frame die like Intricate Swirl Frames Die. This just takes a minute but the results are beautiful.
I have also used Frame a Card Leafy Borders Die to create another border inside the die cut cardbase.
This is a very versatile die that has 4 different sizes of borders which can be used to create a border for a lot of card sizes and they can be used independently also as borders or accent pieces. If you click on the link it will take you to the product inspiration page where you can get a lot of ideas to use these dies.

Coming back to the current card... I think glitter adds a lot of interest to any card. and a mess free way of adding glitter is to use glitter cardstock and glitter embossing powder such as  WOW metallic silver sparkle embossing powder.

Read till the end for the supply list & instructions for this project
20180425_153242

20180425_153422

Heartfelt Creations Products: 

HCPC-3815 Words Of Comfort Stamp Set
HCD2-7190 Frame a Card Leafy Borders Die
HCD2-7191 Intricate Swirl Frames Die
HCPP3-452 12 x 12 Cardstock Pack of 25 - White
RAHT Heat It Craft Tool
173842 Scor-Pal Measuring & Scoring Board
D110305 Stamp Mat Pad
359848 Spellbinders Tool N' One
31510 Funnel Tray
411231 5pc. Acrylic Block Set
532423-KIT Sizzix Vagabond 2 With Solo Wafer-Thin Die Adapter
159723 Designer Dries Clear Adhesive
352854 Metal Tip for Adhesive Bottles
D120601 Darice Adhesive Foam Strips

Other Products:

 WOW metallic silver sparkle embossing powderVersamark Ink & Silver glitter paper.

Instructions:

Die cut a piece of white cardstock using the largest die from Intricate Swirl Frames Die and adhere it to a 4" x 6" white cardbase so that the cardbase doesn't show through the lacy border. Die cut 2 each of  6" and 4" borders using the dies from Frame a Card Leafy Borders Die. Adhere them on silver glitter paper using Designer Dries Clear Adhesive attached with Metal Tip. Trim the excess glitter paper and adhere the borders to create a frame as shown using  Darice Adhesive Foam Strips.

Stamp the sentiment from Words Of Comfort Stamp Set using Versamark Ink on a piece of white cardstock and heat emboss it using Heat It Craft Tool &  WOW metallic silver sparkle embossing powder. Trim around the sentiment & adhere it to a slightly bigger silver glitter paper. Adhere it to the center of the frame as shown.


Hope you like this card...
Thank you for visiting today... :)
Nupur
Disclosure : Compensated affiliate links used when possible  at NO additional cost to you.. Thank you!